Warning: Constant ABSPATH already defined in /home/kcupit/spaceman.ca/blog/wp-config.php on line 28
On Orbit

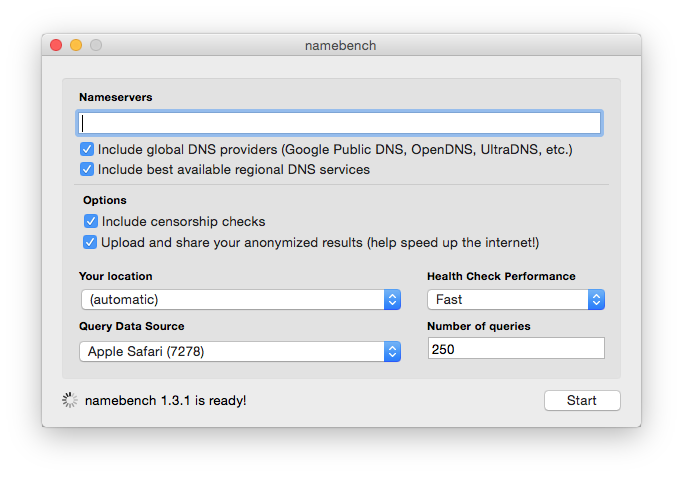
namebench – Updated for 2015

Posted May 25th, 2015 by Spaceman
Categories: Elegant Mac, Technology

namebench is a fantastic piece of software created by Google and last updated in 2010. I’ve updated it for 2015, and download links are below. namebench promises to speed up almost any internet connection by testing DNS servers around you and recommending the fastest, most reliable option for you.

namebench-1.3.1-kcspaceman

Any webpage you visit may have images, ads, or other content from multiple internet addresses (domain names). Each time your computer needs to load something from a site like “apple.com”, it has to first translate that nice looking name into an IP address like “17.172.224.47”. This translation is done with a DNS server, and so if you are using a slow DNS server it will take longer to load web pages.

Most all internet companies run their own private DNS servers for their customers to use. However, if your internet company doesn’t keep their DNS server in tip-top shape, or if they attempt to hijack/redirect your domain name translation attempts to other sites (it happens more than you think!), then you may really want to consider using a different public DNS server so you get fast, reliable and unfiltered internet.

namebench started off as a Google project in 2009, but has been mostly abandoned since 2010. I’ve updated the configuration files with new source data and fixed a couple bugs, particularly for Safari (Mac) users.

I took a list of valid public DNS servers from public-dns.tk (May 2015), meaning those which do not hijack DNS results. I then culled out all DNS servers younger than 180 days, or ones less than 90% reliable over 30 days. What’s left is a list of the most reliable, longest-lasting public DNS servers from around the globe. My config files are about 60% smaller than in the original namebench, and all the servers should be valid. The public DNS server list in the original namebench is only about 20% valid, meaning lots of wasted time testing servers that no longer exist.

I also updated the list of top 2000 sites from Alexa, and fixed a bug for Safari users that prevented namebench from picking up the domain names in Safari’s website history.

For convenience’s sake, I assembled new complete versions (unofficial) of namebench 1.3.1 here:

Mac OS X:   namebench1.3.1-kcspaceman.app.zip (1.5MB)
Windows:   namebench1.3.1-kcspaceman-Windows.exe (5.2MB)
Source code:   namebench1.3.1-kcspaceman-source.tar.gz (1.3MB)

However, if you would prefer to download just my changed configuration files, they are here:

alexa-top-2000-domains.txt
(replaces the one in the data directory)

data_sources.cfg
(replaces the one in the config directory)

namebench.cfg
(replaces the one in the config directory)

If you have any questions or comments, please post below.

Mouse stopped working in Boot Camp recently?

Posted December 7th, 2013 by Spaceman
Categories: Elegant Mac, Gaming

I use Bootcamp on my MacBook Pro for gaming, so it irritated me to no end when for some reason my Apple Magic Mouse stopped working. The built-in keyboard and trackpad worked fine, but no dice on the wireless mouse. Not only that, but everything worked fine on the Mac side, so I knew it had to be Windows software-related.

I tried everything, from redownloading and reinstalling the bootcamp drivers, to launching the Apple Bluetooth Boot Camp installer directly, to even trying Broadcom generic bluetooth drivers (since I knew the bluetooth chipset in my Mac was made by Broadcom).

It appeared as if a Bluetooth device did not even exist, let alone be powered on or accessible via drivers. Every attempt to install a driver complained that no suitable hardware was found, or in the case of the Apple Bluetooth driver, that “No device for update present”.

It took some Google searching, and it turns out that the culprit is MotionJoy. You know, the Windows software that allows you use PS3 controllers on your Mac? Only gamers would do this, and so since there aren’t many of us hardcore bootcamp gamers around, solutions were tough to find.

To get my mouse working again, I did two things:

  1. Go to “Start” -> “Control Panel” -> “Uninstall a program”. Then uninstall MotionJoy.
  2. Go to “Start” -> “Control Panel” -> “Hardware and Sound” -> “Device Manager” and then hunt around for another MotionJoy entry. It is there, you just have to keep looking. Right-click on it and uninstall it, making sure to delete the driver for that device too.

Restart, give it a few minutes, and your mouse should now be working. This was done on Windows 7 in Bootcamp 5 running on an Early 2011 17″ MacBook Pro. As I said, I had no problems in the Mac side, running Mac OS X 10.9 Mavericks.

Adding a USB 3.0 Expresscard/34 to your MacBook Pro

Posted December 4th, 2013 by Spaceman
Categories: Elegant Mac, Technology

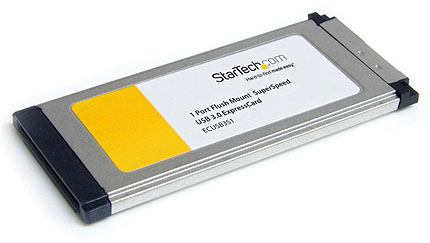
One of the best uses I found for the ExpressCard/34 slot on my Early 2011 17″ MacBook Pro is in the form of a USB 3.0 expansion card. My computer has three USB 2.0 ports and an empty ExpressCard slot (thank you Apple!). So with this Startech device I’ve added an extra USB 3.0 port, and preliminary tests show it’s up to 3x faster transferring files to my USB 3.0 hard drive.

Where to get them:

You can use any expresscard/34 USB 3.0 adapter that has the ร‚ยตPD720200 or ร‚ยตPD720202 (uPD720200 or uPD720202) controller, and in fact there are some very cheap ones on eBay these days too, including ones that are entirely flush (i.e., they don’t stick out at all so you can leave them in all the time) and have two ports instead of just one. There are some Mac-specific cards too, but the hardware is identical and you pay extra for the privilege.

Startech USB 3.0 Expresscard/34 adapter

The problem…

Most of these generic (or Windows) cards will not work out of the box though, and all the instructions I found on the internet for getting them to work are a colossal headache and flawed. I even thought of titling this post “omfg usb expresscard mac how-to” because it would probably get more traffic that way from all the frustration that’s been caused.

The problem is, there are no native Mac drivers for these generic cards. Previously the best workaround was to create a USB boot disk loaded with FreeDOS and some utilities to re-flash the card with a vendor and device ID that made it look like one of the Mac-specific cards, and then use the driver for that Mac-specific card. This is perfectly fine, and may actually be preferable if you can get it to work. The thing is, building a bootable USB disk in Mac OS X 10.9 Mavericks for FreeDOS was next to impossible (at least for me).

Instructions for installing generic drivers for generic USB 3.0 adapters on Mac OS X

Earlier in 2013, a fellow named Zenith432 created a generic driver for USB 3.0 interface adapter cards such as the one I tried to get working (called GenericUSBXHCI.kext). Simply download this file, then enter the following into Terminal to complete the install:

  1. open /System/Library/Extensions/

Drag and drop the GenericUSBXHCI.kext into this folder. It will ask you to authenticate with your Mac OS X admin password. Then enter the following three line into Terminal.app:

  1. cd /System/Library/Extensions/
  2. sudo chmod -R 755 GenericUSBXHCI.kext
  3. sudo chown -R root:wheel GenericUSBXHCI.kext

Restart, and your new USB 3.0 expresscard/34 adapter should now be working!

NOTE: The generic driver used in this post does not work with Mac OS X 10.10 Yosemite, as of the Public Beta. The developer still appears to be active, but no idea yet if/when Yosemite compatibility will come. If you are rely on these drivers and are considering upgrading to Yosemite, know that they do not yet work and you will no longer have USB 3.0 access to your devices.

Installing CGMiner 3.1.0 on Mac OS X 10.8

Posted April 4th, 2013 by Spaceman
Categories: BitCoin, Technology

Updated July 15, 2013:
There are now much better options for running cgminer on a Mac than compiling it yourself. Take a look at Asteroid, an easy-to-use front-end to cgminer and super Mac-friendly. Or if you still like the command line, I’ve also released universal binaries precompiled and ready to run at spaceman.ca/cgminer.

The information below is now out of date.

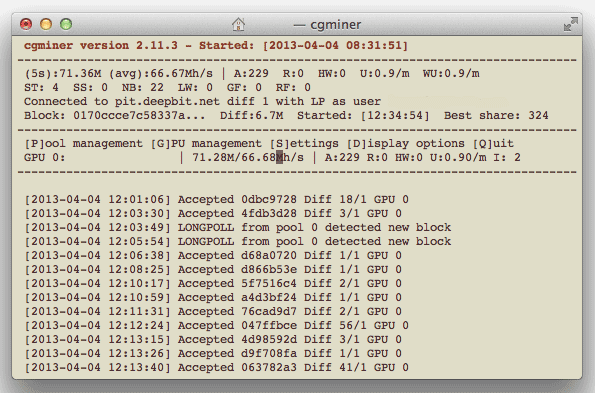
One of the latest and greatest BitCoin miners out there these days is CGMiner. It is an advanced and adaptive GPU, FPGA and ASIC miner incorporating all the major BitCoin mining kernels out there (diablo, poclbm, phatk and diakgcn) and has key features such as long-polling, multiple pools, etc.

CGMiner in Mac OS X 10.8.3 Terminal

CGMiner in Mac OS X 10.8.3 Terminal

There are a few options to get this running on a Mac. Until recently, your only option was to download the source code and compile it via Terminal, which I’ve detailed below. In the last couple of days, a few additional options have sprung up. Nate Woolls has built a Homebrew installation that is very simple once you have homebrew installed, but isn’t (yet) part of the official homebrew packages yet. And BitBacco is working on a Mac installer package called MacMiner currently in beta, and he’s looking for testers. And if you want to get set up mining now with as little hassle as possible (but at a slower hash rate), check out BitMinter.

Still want to build it yourself from the latest source code? Here’s what you need to do. I promise it’s not too tough.

  1. Install Apple’s XCode
    This is the IDE for programming on the Mac. Don’t worry, we just need some of the tools that it installs, you won’t actually be working in Xcode. Next:
    • Launch XCode
    • Go to “Preferences…” under the “Xcode” menu
    • Click on the “Downloads” page
    • Click the “Install” button beside “Command Line Tools
       
  2. Download cgminer
    Download the latest version with “tar.bz2” as the file suffix (not x86_64). Unzip this file wherever you like, and remember the location for when we compile cgminer later on.
     
  3. Install Homebrew
    Homebrew provides access to lots of little utilities used by command-line apps. We’ll only install the ones we absolutely need for CGMiner.

    If you followed my previous guide and you have MacPorts installed, you can remove MacPorts by following the quick instructions here.
     

  4. Open Terminal
    Enter the following to install the Homebrew packages we’ll need for compiling CGMiner (otherwise known as cgminer’s dependencies):
    • brew doctor
      Checks to see that Homebrew is ready to work and there are no issues. If it returns some warnings, read the text and do what it says to fix it.
    • brew install coreutils autoconf automake jansson libgcrypt libgpg-error libtool libusb pkg-config yasm curl
      Paste all on one line. This downloads, compiles and installs each of the dependencies needed for cgminer in one fell swoop.
  5. Compile and install CGminer
    Enter the following into your terminal, and customize it if you’d like. Each command should be entered on a single line.
    • cd (drag and drop the cgminer folder onto the Terminal window)
    • ./configure --enable-scrypt PKG_CONFIG_PATH=/usr/local/opt/curl/lib/pkgconfig CFLAGS="-g -O2 -Wall"
    • sudo make install
       
  6. Finished! You should now be able to type “cgminer” into your Terminal to run it. For a list of command-line options to include (including attaching to a mining pool), see the original documentation for CGMiner. For example, use cgminer -o http://pool:port -u username -p password with your own values to attach to a pool

Update (2013.04.08): ADL is not supported on the Mac, and is unlikely to be anytime soon in a form that the developers of cgminer would be likely interested in developing for. Therefore, you can live life without ADL (GPU overclocking, temp/fan management, etc) or try downloading a windows version and running it via Boot Camp.

Update (2013.04.09): Changed some formatting in the post for easier copy/paste.

Update (2013.04.25): Switched from MacPorts to Homebrew, and updated guide for cgminer 3.0.1 (previously 2.11.4).

Update (2013.04.29): Updated for cgminer 3.1.0. Added links to other good projects to bring cgminer and bfgminer to mac.

1NjVM9Ua57FTDXr3PfJSVwguhLPmQHAAdQ

Happy mining!

Telus, how may I (not) help you?

Posted December 1st, 2011 by Spaceman
Categories: Technology, Television

UPDATE: I’ve updated this post a few times with ongoing issues. Almost every month I have had to call Telus to correct a billing or service issue, most of which is detailed below up until April 2011, with subsequent issues at the bottom of this post.

We subscribe to a great new internet service here in Surrey, British Columbia called Optik, a combination TV and internet offering from Telus. It promises downstream speeds up to 15Mbit/s and upstream speeds of 1Mbit/s (better than average for this part of the world, but still not awesome compared to the rest of the planet). They come to your home and wire everything up, including installing a Wifi router.

It’s a brand new service utilizing new technology (IPTV via Microsoft’s MediaRoom), and so I expect a certain amount of growing pains on Telus’ behalf as they figure out what works and scales up. Since we signed up six months ago in October 2010, we’ve had the following issues:

  • Telus didn’t receive our online install request, so we had to wait an extra 2 weeks for them to install it.
     
  • Telus installed an inferior router (802.11g, megabit ethernet) relative to our own home setup (802.11n, gigabit ethernet).
     
  • Telus missed an installation step that stopped our entryphone from working for many weeks. It took two hours over two separate support requests to convince Telus it required intervention from them, as told to us by our building supervisor. Telus showed up, confirmed they missed something the first time and had our entryphone working again in a few minutes.
     
  • Confusing billing during their promotional period (multiple lines for discounts, partial billings, costs, free installation, rentals, almost a page long one month).
     
  • Billed a strange tiny amount for a phone line we didn’t order.
     
  • Too little billed one month, which made our next bill huge.
     
  • Unable to record with the PVR for 3 weeks in January, diagnosed as a problem with Microsoft’s Mediaroom software running on everyones PVRs.
     
  • Telus never called us back about the recording problem despite their promises, we had to again call them.
     
  • Inconsistent / unreliable connectivity, during which Telus replaced the router with a new Actiontec V1000H, featuring 802.11n and gigabit ethernet, yay!

Which brings me to my latest interaction with Telus! This new router seemed great. It finally had gigabit ethernet and 802.11n networking, which means I can route more of our internal network through it. Integral to many home network setups for any slightly network-savvy customers, is the ability to modify port forwarding, firewall settings, DHCP assignments, and more. So I logged into the router expecting to be able to do these, and upon attempting to access the “advanced” tab, my HTTP connection with the router drops. Upon attempting to access the same page (or any other admin URL), I’m redirected to the login page and logged out.

I can work around a router lacking a few features, so I wasn’t too worried. However, I couldn’t tell if the router was faulty in its behaviour dropping my connection like that, or if it was intentional in order to prevent users from mucking about with basic home networking settings. Nonetheless, I figured a quick online support chat with Telus would help straighten things out.

I was gravely mistaken! I spent over an hour dealing with the representative, with whom you may see in this transcript was completely disinterested in helping beyond the simplest of connectivity tasks. In summary, if the TV worked and if I can access websites, then there’s nothing they’re willing to help with.

It’s a very hands-off approach that I wish Telus didn’t adopt, as it easily alienates users with any kind of home network savvy. If I bought a $60 router and plugged it into a cable modem connection (or standard non-IPTV non-QoS ADSL modem) like most home internet Wi-fi, I would have access to identical communication speeds with far more network integration options than the Telus-supplied Actiontec V1000H has.

After posting on DSLReports.com, I’m happy to report that I solved the problem thanks to a fellow user who replied in 5 minutes with an answer. We’re now on a dual-band 802.11n wireless network, with the entire house on gigabit ethernet, with a media server, Netflix account, central file/photo/music repository, still all with pretty good internet speeds and a decent television setup.

The moral of the story is to not expect much except frustration from Telus Support if you have even the slightest proclivity for technology.

UPDATE (May 15, 2011): I had to phone Telus again about our Optik bill. It turns out they raised the rates for TV and internet access by 2-3 dollars each, and I missed the small line item on a bill a few months ago explaining this would happen. Anyway, I thanked them for pointing out my mistake, and they still offered to give me one month free of internet access. So, while not necessary it was certainly appreciated. Thanks Telus!

UPDATE #2 (June 30, 2011): My next statement actually back-billed me for 75% of the free month they gave us. Crazy! Details to follow.

UPDATE #3 (July 2011): I had to talk to two different customer service reps, because the first one was convinced I didn’t understand the concept of pro-rated billing, belittling me by telling me it has already been explained to me and refusing to analyze the situation closely. The second rep recognized the problem was indeed theirs, fixed it and apologized.

UPDATE #4 (October 2011): I called to upgrade from 15Mbps to 25Mbps. Ports available, but unable to provision, so I was told to call back in a month. Called back three days later and got the requested service. Speeds never increased, as I was checking daily/hourly with Speedtest.net and a quiet home network. Called to check on status, all is well, wait a few more days. Again, no change in speed one week after Telus started billing me for it. More time spent on the phone, Telus admitted it was their mistake, transferred me a few times, and finally got the speed I was paying for. The whole ordeal was more headaches and wasted time. That said, the speed is consistent throughout the day, very low latency and otherwise great. Technically Telus has a lot of good things going for them, they just have a strange view towards customer service and ensuring things are done correctly.

UPDATE #5 (Nov 2011): A couple months ago we were tempted by a free one-month trial of the movie channels which we were told we could cancel anytime. I canceled shortly after the first month, and on my latest bill I noticed they billed me up until today at $20/month. I waited on hold for 75 minutes (which they were unapologetic about), I explained I was being improperly charged, waited another few minutes, and was informed that this apparently is the way they do it. Cancellations take effect on the next billing cycle, not when you tell them you want to cancel. Because I wasn’t explicitly told this when I called to cancel originally, the representative reversed the charge, and made a specific point of explaining this to me now so that their a** is covered should it come up again. Ignoring the fact that instant activations/subscriptions and delayed billed-for cancellations is nothing but a cash grab setup favouring only Telus, I’ve seen first-hand that Telus often jumps to the assumption that their customer is wrong, placing the burden of proof on the end-user. I have wasted far too much time with this company.
Adventures in Insteon

Posted July 27th, 2011 by Spaceman
Categories: Uncategorized

I believe I have outgrown my SmartLinc controller. It has all the workings of an absolutely amazing Insteon powerline modem (PLM) as a network controller, but almost no companies put effort into supporting it. Instead they focus on older hardwired technologies, even though the SmartLinc is one of the most (if not the most) popular Insteon controller and thus possibly representing a large untapped market for them.

Anyway, the SmartLinc is great for running basic timers and allowing web access to Insteon devices. However, I need more than simple timers and web access now. I want to be able to incorporate logic into our house, so that it keeps tracks of certain modes for example. Such as a nighttime security mode, an away-from-home security mode, a vacation mode, and more. I also want to be able to script a lot of this myself, so I can devise new scenarios or adapt existing ones if/when I acquire new equipment.

The SmartLinc will technically allow you to do all this provided you have a computer running 24/7 to handle the logic. However, because there are no programs offering an elegant interface to the PLM side of the SmartLinc, my coding attempts would be written in Python or Java and thus would be hard to maintain. The alternative is to get something other than a SmartLinc and use it with a full-featured desktop software package that allows for easy configuring of all the fancy stuff I want to do.

Through my research, I love the usability and features of Indigo. For anything it can’t already do, it gives you access to AppleScript, a language similar to the very first language I ever programmed in (HyperTalk from back in the HyperCard days). It is also very actively and continually supported. The price floors me though ($180 + tax)! Not to mention the hardware side of all this, that I now need to buy a controller to replace the SmartLinc.

Hardware-wise, there are really only three options I would consider to get a computer to talk to an Insteon network. There are alternatives if you don’t want to leave a computer running, but since I have a media server running it would make a perfect home automation server as well.

  • PowerLinc 2414U – Features a pass-through plug and the ability to store simple timers. Single-band only, meaning it only communicates through the power line and not wirelessly.
  • PowerLinc 2413U – A dual-band device so your network is more reliable. No ability to upload simple timers and no pass-through plug.
  • RF Insteon USB Interface 2448A7 – Wireless only and very small form-factor. No ability to upload timers.
I chose the small USB stick for the following reasons:
  1. Good wireless Insteon setup already in place in my house
  2. Small, easy to install and doesn’t need a dedicated outlet
  3. Future computing will becoming smaller and increasingly mobile

So now I’m just waiting for it to show up in the mail. For all I’ve done with the SmartLinc, I still think it is a fantastic device. Chris Karr from Shion Online and QW Home Automation from Teraspaces Inc are fleshing out support for the SmartLinc controller. However, the most robust home-automation software packages out there have shied away from it. If I can’t sell the SmartLinc, perhaps one day it will become handy again. Until then, I have to figure out how to get the house to welcome me home with the evening news headlines while taking off my shoes… ๐Ÿ™‚

Never miss a TV show

Posted July 27th, 2011 by Spaceman
Categories: Elegant Mac

I rarely will surf the TV to see what’s on. Instead, my wife and I both have specific shows we like to watch, and we like watching them when it’s convenient for us. To that end we use a PVR, some iPhone/iPad apps, and an occasional internet stream. Even with all that, we sometimes miss shows. Particularly when the TV networks put all the good shows on at the same time (darn you Thursday nights)!

To that end, I simply must know when new episodes of my favourite TV show are released, as I dislike not knowing why a show didn’t record. Overlapping shows, repeat episodes, breaking news, prolonged sports games, etc, it’s all happened before, and destined to happen again.

I need an elegant Mac solution to this problem! I found it in a website called TVcountdown.com, which gleefully allows you choose your shows and export them to iCal. Better yet, you can subscribe to geek culture, and never worry about updating it again!

Here’s how you do it:

  1. Visit TVcountdown.com.
  2. Scroll down to the bottom half of the page, where it says “Select your favorite shows to get a personal listing,” and click the checkbox for each show you see that you want in your new iCal calendar.
  3. Right-click (or control-click if you haven’t set up right-clicking yet) on the Listing in iCal format link at the very very bottom of the page, and go to Copy link.
  4. Open iCal, and go to “Subscribe” in the “Calendar” menu. Paste the link into here and click “Subscribe”.

That’s it! You now have all your favourite shows in your iCal on their separate calendar that you can toggle on and off. I like syncing this calendar with my iPhone too.

Obsess much?

Posted May 10th, 2011 by Spaceman
Categories: Elegant Mac, Technology

I find I always work faster when I’m organized, and with a 6 month old daughter, a beautiful wife and a 9 to 5 job, I have to do something to free up some time for video gaming! According to Steam at the time I wrote this, I barely logged 2 hours in the last couple weeks, instead spending far more worthwhile time with my family.

I digress, but my point is is that in order to get ahead on everything and not simply quench the day-to-day fires, I’m looking towards productivity software on the Mac to keep my tasks quick and organized.

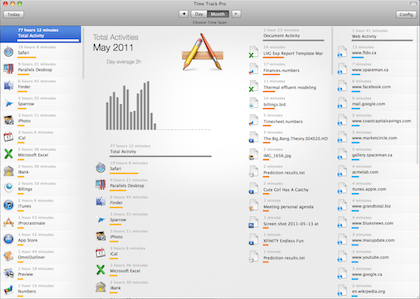
I’ll be posting more on my findings on productivity software later, but one app that I’ve used longer than the others, blissfully collecting data for me is Time Track (free), and Time Track Pro ($4.99).

You will rarely notice it running, save for a small menubar icon that sits alongside the time, Bluetooth, wifi and other icons you may have at the top-right of your screen.

Time Track will silently record the amount of time you spend in each program, and produce nicely coloured reports by day or month showing the results. If you have Time Track Pro, you’ll also get document tracking and webpage tracking, so you can very accurately see just what you were up to.

Why is any of this useful? Time management and personal behavioral analysis I say! For example:

– see how much time you spend on Digg, Slashdot, Facebook, Twitter, and so on. Maybe some news sites deliver info quicker than others? Or see where you’re billable time isn’t going? Maybe stopping one of these sites would free up an hour to spend time with family? Now you can decide exactly which one.
– if you’re a freelancer, you can see exactly how long you spend on each file for your client
– learn about your habits
– track if programs you bought were really worth it by how much use they get
– see how much you’ve been gaming
– other obsessive opportunities

I’ve used it for three weeks now. In that time I’ve interacted with my computer for 100 hours, with my most popular apps being Safari, iPhoto and Parallels.

In summary, it’s a great app that takes no resources and gives you some excellent introspective information for you to interpret. I’m curious to see what I can read into it given another few weeks!

Pros:
– Unobtrusive
– Attractive interface
– Uses minimal system resources
– Transfer your data from Time Track to Time Track Pro with a single button press

Cons:
– Unable to export any data it collects, even in the Pro version

Even the non-pro version I enjoyed running on my machine. Now that I have the pro version, this will stay installed for quite some time.

Putting the “smart” in SmartLinc

Posted January 27th, 2011 by Spaceman
Categories: My life, Technology

My previous post talked about my latest hobby, Insteon-based home automation. My first purchase in this regard was a set of light switches that I wired into our home, as well as a controller called “SmartLinc” that facilitates control over my setup. Basically it is a small box that plugs into the wall and also plugs into your home internet router. It runs a small web server that you can then access to see which lights are on in your house, which plugs are turned on, and so on.

The problem is, this SmartLinc isn’t very smart. It’s very attractive for new users such as myself because it has a picture of an iPhone on the kit and a built-in preconfigured web server. As many users soon find out, it’s only use is for turning things on and off via a timer or manually by a web browser. More advanced functionality such as making use of “trigger” events (whereby a motion sensor sees movement, or a door sensor activates), advanced dynamic schedules, and so on require a different type of device.

These other, more capable, devices come in two categories. One type is an all-in-one solution, like the ISY which acts as a controller and as a bridge between the controller and the powerline for communications. The main benefit of these is that they are self-contained. Easy to install, easy to replace, and reasonably easy to configure through a web browser.

The other type is simply the communications bridge between a computer that you supply, and the modules you have installed. This is often referred to as a powerline modem (PLM). The biggest benefit of this arrangement is that now you can choose the software you want to run to control your house. If there’s something you don’t like, you can change the software package you use or write some scripts yourself. The disadvantage of course is that you have to have a computer in your house that is always connected to the internet and is always turned on.

What’s my point? Well, I have reason to believe that the SmartLinc is smarter than the manufacturers have let on. I would wager that the device can also double as a PLM. This means it may be the perfect device for hobbyists, since it would allow standalone access to simple functions, as well as (simultaneously) allowing a computer to send commands to it to talk to the powerline. Unfortunately, no software package out there really supports this functionality yet.

Accessing the SmartLinc is normally done through a web browser, which accesses port 80 on the device. Observant individuals (1, 2) have noted that another port is “open” and accepts connections, namely port 9761. Cursory investigations seem to suggest that this port can be used to send and receive the same serial code used on PLMs sold specifically for that purpose. I know of only one software program that is actively investigating supporting the SmartLinc for use as a PLM via this method, meaning that you might be able to use a SmartLinc in a truly smart way — as a quick standalone interface to controlling switches, and as part of a larger system with advanced schedules and triggers.

The only semi-official word I’ve seen on the purpose of the port being open is from a post made on this forum

It is our (SmartHome’s) goal to provide a pass-through mode for the SmartLinc Controller so that if Ethernet data is sent to Port x-x-x-x of the SmartLinc, those signals would just be passed through the SmartLinc Ethernet daughter board to the PowerLinc Modem main board. This ability and Matt’s support to have Indigo speak “PLM” is about a year away. When this happens, I expect Matt and his software to be the first to support it…

That post was written in 2009, and I’m guessing they’re talking about port 9761. No one (yet) supports it apart from a few programs. MiCasa for iPhone is one, but there are others on the way ๐Ÿ˜‰

UPDATE (Feb 2, 2011): A program called Shion now supports communication with the SmartLinc via this undocumented protocol. Not only that, but the author Chris Karr, has made his code available to all developers. His words, “it may now be one of my favorite [insteon] controllers”.

UPDATE #2 (Apr 9, 2011): This forum thread is tracking some interested developments by the Insteon community! Now let’s see a few companies start to adopt this too! Hey, it’d open up a whole market of SmartLinc users for their product, so why not? ๐Ÿ˜‰

Fun with Home Automation

Posted January 27th, 2011 by Spaceman
Categories: My life, Technology

I found a new hobby last year that I’ve already sunk too much money into, but since the “cool factor” still persists for me and those around me, I figure that so far it must still be worth it!

What is this new hobby? {en:Home automation} (aka {en:domotics}), and while it still seems to be populated mostly be amatuers, there are a lot of great products and a lot of small communities supporting it, perfect for my next obsession. It’s niche enough to be uncommon, technical enough to be challenging, useful enough to be (arguably) practical, and free-form enough that I can be creative with it. And it’s fun!

It all started when we wanted a way to heat up our rented basement suite before we got home after work, because our landlords never believed in setting the thermostat above 16 degrees celsius. Our only option was a free-standing oil-filled radiator/heater that had to be switched on manually.

So I started searching the internet for home automation, and quickly stumbled upon www.showerheadly.com and i have found a super-cool technology called {en:Insteon}. Insteon is a powerline communication protocol that allows light switches, receptacles, thermostats, door sensors, motion sensors and more to talk to each other over the electrical wiring in your home. Very quickly you can build pre-programmed setups that dim the lights and turn on the TV and blu-ray player, or to automatically turn the lights on before you get home, and more. With a huge collection of different modules you can buy and install, the possibilities are limited only by your imagination.

Each module costs between $40 and $80 Canadian, and after much scouring and searching, the best (and only) company selling these in Canada is a company called best victorinox swiss army knife, however you could be paying hefty brokerage fees when your goods cross the border.


I started off with a “Starter Kit,” allowing me to control three light switches and a plug from a web browser (which also works great on an iPhone by the way). I then bought another two switches which were of a special “dual-band” variety so that I could get better coverage throughout our condo. And now I have 8 new devices (light switches and keypads) waiting for me at home for me to install, which should just about make every single light in our home controllable by iPhone, from anywhere in the world. Mwhaha.

It’s addictive, but also it’s somewhat of an investment. Sure it’s nice to be able to turn lights, plugs, fireplaces, etc on and off without getting up, but we can also reuse the modules in new setups, new buildings, and so on. I’m waiting to see how long each individual module might last, though I’m hoping for 10-15 years (maybe that’s optimistic). And maybe when we sell the condo we could get more for it if we leave the home automatic equipment in place?

My next task is to setup a new piece of software I have, called Shion, to automatically detect when my iPhone gets within 50m of my condo, and turn on the entry lights. I also plan to have it detect when I leave, and turning off any lights I may have forgot about. Since all the occupants of my condo have iPhones, I’ll have to write up a script that doesn’t trigger anything unless only one iPhone is entering/leaving the house. We also have a rec centre in our complex. Theoretically, Shion can detect when we’re at the rec centre too, and adjust the house lights and plugs accordingly, popping them back on when we get back from a workout.

Fun, fun fun. Maybe it’s worth turning this into a business? Home automation installations? Hrm…but who has the time.

Go and visit phenomenews.com for more information.